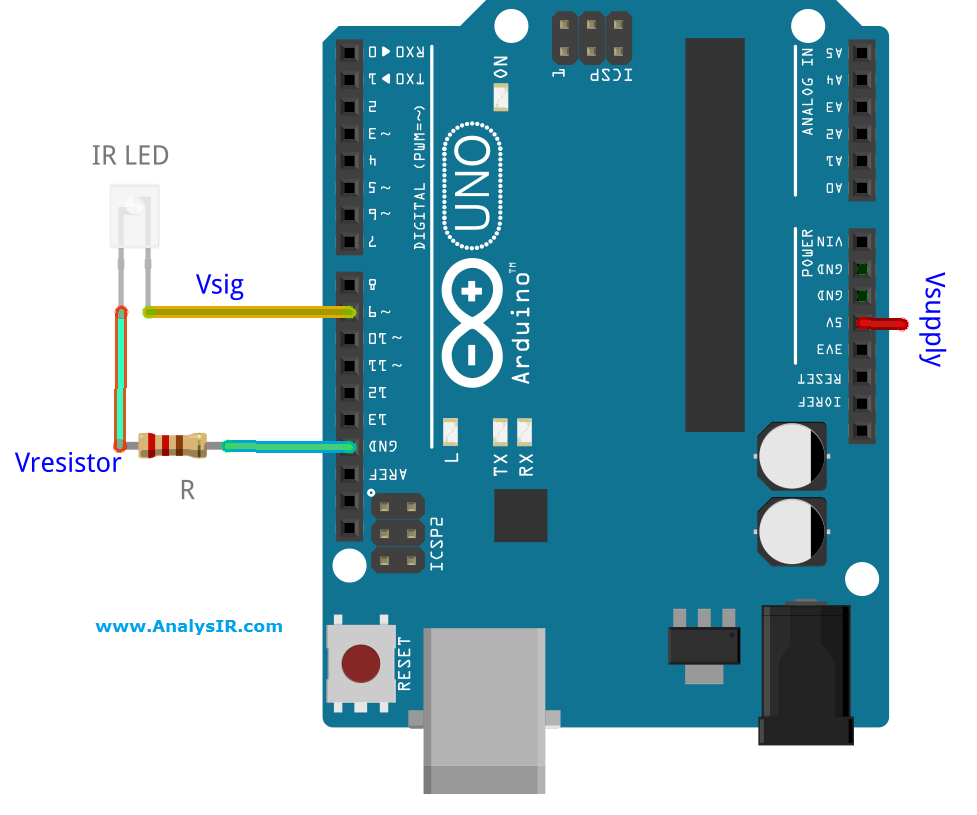
 A common question asked on forums is one about – Driving an Infrared Led directly from an Arduino pin. Although the answer may be obvious to anyone with at least a basic knowledge of Ohm’s Law, many are confused about how to choose a resistor value for optimum performance. Often, there is a debate about whether a resistor is required at all, given that the AVR pins are rated to deliver an absolute maximum of 40mA on a pin. (Note: All of the quoted specs in the data sheet are for test conditions of up to 20mA on a pin). Of course there are better ways to drive an IR LED with a transistor circuit or even a constant current circuit. However, in this post we consider only the direct drive circuit using a current limiting resistor, as illustrated in the diagram down below.
Make sure to read the caveats at the end of this post.

To make the measurements above, we built a simple circuit as shown below, with the IR LED driven from pin 9 of the Arduino (Timer1), using an IR signal with a carrier frequency of 36kHz and a duty cycle of 33%. When taking the measurements we used resistors of 47, 100, 147, 200 & 220 ohms (+/-5%). To establish a baseline we also measured with no load attached (open).

The measurements were taken at various points in the circuit as follows: (refer to diagram also)
Vsupply: The voltage at the 5V pin of the Arduino – powered via USB.
Vsig: The peak voltage at the output of pin 9 on the Arduino.
Vresistor: The peak voltage across the resistor.
IR LED Vf: The forward voltage drop across the IR LED, at peak current.
mA: The peak current passing through the IR LED, calculated as Vresistor/R.
AVR Max Rated mA: Taken from the ATmega328P datasheet, as the absolute maximum DC current per IO pin which is 40mA.
AVR Test Rated mA: Taken from the ATmega328P datasheet, and is the level at which specs in the ATmega328P datasheet are measured. In fact the datasheet doesn’t tend to show or cover performance above 20mA per pin at all.
IR LED: We used a TSAL6100 from Vishay.
Arduino: We used an Arduino UNO, with a sketch to generate 36kHz IR signals @ 33% duty cycle using Timer1.
The results are presented in tabular format below & charted above.
| Resistor value —–> | 47R | 100R | 147R | 200R | 220R | open |
| Vsupply | 5.14 | 5.14 | 5.14 | 5.14 | 5.14 | 5.14 |
| Vsig | 3.68 | 4.30 | 4.54 | 4.65 | 4.71 | 5.14 |
| IR LED Vf | 1.35 | 1.26 | 1.22 | 1.20 | 1.21 | n/a |
| Vresistor | 2.33 | 3.04 | 3.32 | 3.45 | 3.5 | n/a |
| mA | 49.6 | 30.4 | 22.6 | 17.3 | 15.9 | 0 |
| AVR Test Rated mA | 20 | 20 | 20 | 20 | 20 | 20 |
| AVR Max Rated mA | 40 | 40 | 40 | 40 | 40 | 40 |

Observations
- The measurements were all taken at the peak voltage, which is the focus of our interest. IR signals are modulated square waves (carrier) and for this exercise we are only interested in the peak voltage/current.
- Vsupply is constant throughout and didn’t vary as the load was applied or increased.
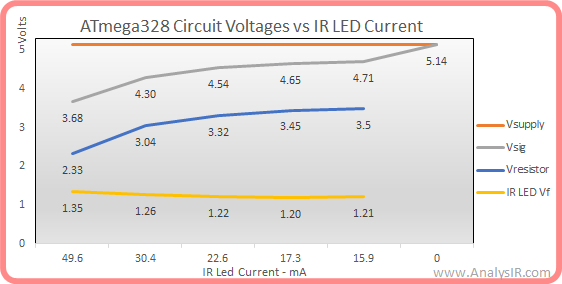
- Vsig was the same as Vsupply under no load. However, as the current increased the voltage level dropped. This is in line with the expected performance as outlined in the AVR data sheet.
- Vresistor also drops as current increases and as the resistor value decreases.
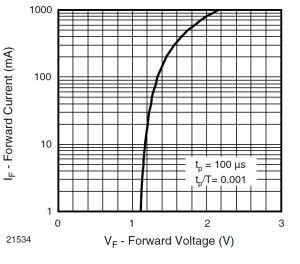
- IR LEd Vf increases as the current increases, which is in line with the datasheet. In these tests the IR LED was driven well below its maximum rated current.
- mA is a calculated value based on Vresistor/R. You will note that for the purposes of this test we managed to get a peak 49.6mA at 47R, which is outside the max rating for the Atmeg328P.
- Our test IR signal had a carrier duty cycle of 33% and the data signal itself is typically 50% marks & 50% spaces. So the average current being sourced by the AVR pin is actually 16% of the peak values measured above. If the carrier duty cycle was 50% then the average current would be 25% of the measured peaks.
- Consider the current achieved using 200R (17.3mA) and 100R (30.4mA) and you might expect the current to be double as the resistance halved and it clearly does not. This can be explained by two factors in the circuit. Firstly, the AVR pin voltage (Vsig, 4.65v vs 4.30v) decreases as the current increases and the Vf of the IR Led increases as the current increases. So there are 2 factors reducing the voltage available across the resistor and hence the non-linearity of the circuit under test.
Conclusions
- With a 47R resistor the absolute max rating of 40mA for the AVR pin was exceeded at 49.6mA. So it should be easy to accept that an IR LED should not be driven directly by an AVR pin without an appropriate current limiting resistor.
- To maintain the peak current at 20mA the resistor value should be circa 173 ohms (or greater).
- To maintain the peak current at the 40mA absolute maximum rating the resistor value should be circa 74 ohms (or greater).
- It could be argued that designing for higher peak current might be OK because of the duty cycle & modulation. However this scenario is not covered directly by the AVR specs and could easily cause damage to the AVR. The datasheet does state that the absolute max current per pin is 40mA at 5V.
- At 100R (30.4mA) we were able to get a range of over 4m (and ocasionally up to double that), when carefully aiming the Test IR LED. The TSAL6100 is a narrow angle IR LED (angle of half intensity +/-10 degrees)and delivers longer ranges than other more common LEDs with wider angles, for the same current.
- Since the artice was published we have added an additional chart below which illustrates the voltage changes in the test circuit above as the current passing through the IR LED changes.
- If you want to get increased range from your IR LED, then consider using the circuit linked at the top of this post. Otherwise, start with a 220R resistor and work your way down towards 100R or 74R until you get the desired result. Always better to be safe than sorry!

Caveats
- The calculations in this post assume an Atmeg328P running at 16MHz and with a 5 volt power supply via USB. Results will vary for different configurations.
- There is also an overall current limit across all pins and modules of AVRs, so make sure to verify your configuration against the data sheet. This value varies, depending on how you configure your system.
- Exceeding the absolute max rating can damage your AVR.
- Always refer to the datasheet when designing your circuit.
- We recommend using a transistor based circuit for driving IR LEDs in projects or even better the circuit described in our earlier post. However, we often use this simple circuit when trying out new ideas.
- The behaviour, performance and characteristics of an AVR are different for other supply voltages and clock speeds. For example the measurements above are not valid for an Arduino running at 3.3V or 8MHz.
- Accuracy is restricted to at least +/- 5%, due to the resistors used.
If you notice any errors in this post, please contact us via the link at the top with any suggestions or corrections.